![[Bike]](./only2500b.gif)
|
|
The Personal Web Pages of
|
![]()
This document explains a strategy for documenting major relevant geometrical features on bicycles. If you look hard enough in just about any bicycle catalog, you will invariably find a small table listing the geometrical properties of the advertised products. One day, I had a need to actually know what the geometry properties of some of these bikes were. I started to study the catalog's table seriously with the intent of using its information to create a rough computer model of the bikes. It turns out, this was impossible. Amazed, I tried several other bike catalogs. To this day, I have never found a published geometry specification that could actually allow one to know where the critical cycling points were.
Therefore, I decided to create my own system for describing bicycle geometry. The first priority was that the information ultimately reflect the riding experience. Therefore, I wanted the information to be able to specify the geometrical relationship between butt, hands, feet, rear wheel, front wheel, steering angle, and steering trail. The second priority was that the measurements to record this information be relatively easy to collect.
This document does not discuss how different geometrical configuratons affect the cycling experience. It does not provide hints to designing bikes with particular performance features. It is not concerned with the structural elements of a bike frame. It also doesn't apply directly to tandems, recumbents, and other exotic vehicles. This system is by no means perfect, but it has been somewhat worked out to the extent that it seems useful.
The system consists of 9 fundamental measurements and 2 reference ones. Basically each measurement is an X or Y component of a particular point defining the bike's geometry. Everything is 2 dimensional as seen from the side since bicycle frames tend to have predictable symmetry as seen from above. Start with the practical assumption that the X axis is as horizontal as the ground line. The most practical place for the X axis to be then is the ground. Also assume that the bicycle is pointing to the left. With the X axis positive to the right, the X coordinate for the rear wheel will be larger than for the front. Postive Y obviously points up. Given this coordinate system, there are 7 points to measure:
![[diagram]](./pointsA-G.gif)
Point A is best defined as having an X value of 0 (Ax=0). Ay should equal the working radius of the wheel on the bike or 0 if you are just measuring a frame. It doesn't really matter. Measuring from a string that runs from the forks to the dropouts is a good way to be accurate.
To measure A: Ax is defined as 0. Measure center of front axle from even floor for Ay.
Point B is simply the wheelbase. By will be the same as Ay and therefore it is not necessary to measure it unless you suspect the wheels are of significantly differing diameters.
To measure B: For Bx, measure from axle to axle keeping handlebars very straight (i.e. keep the axles very parallel). For By, it should be the same as Ay. Double check if you're not sure.
Point C is the position of the crank. This is the frame's critical point for where the rider's feet wind up.
To measure C: For Cx measure along a bubble level to help you hold the tape measure level. Put one end of the level at point A and hold it horizontal. Find and measure the point on the level that is directly over the crank axle. Use a square on the edge of the level if necessary. Another technique is to tie a string from the front axle to the rear axle. This can be used as the reference line in most cases. For Cy, measure the center of the crank from the floor.
| Point D says a lot (but not everything) about what sort of hand positions the frame will accomodate. The way to think of this point is that if you stuck a stem (with an obtuse angle) into the headset, what would dictate the maximum engagement. The maximum engagement says where the stem can be lowered to. If the bike has a threadless headset, then this measurement will reflect the lowest position that the stem can be clamped, i.e. without spacers. Since this is the practical ramification of this measurement, it is reasonable to measure it with the headset bearing in situ. If you just have a raw frame and fork set without a headset bearing, you will really have no way to know exactly where the lowest handlebar position is. For this reason, it is an absolute requirement to at least speculate about the distance above the head tube that the headset works will require. Considering the headset as a an integral part of the frame is pragmatic concession to the fact that all bikes that are rideable have headset bearings installed. The other aspect to this measurement is "center of the head tube"; this means that as seen from the side, the measurement is made in the middle of the headset bearing and headtube and forktube, etc. |

|
To measure D: I try to mark the point that I will be measuring with a piece of tape or a pencil mark. This keeps Dx and Dy based on the same point. Dx is the hard one and I measure it from a vertical bubble level positioned over the front axle. Then for Dy, just measure to the floor. It's important for these measurements to have the bike very vertical. Check it with the level and by measuring both sides to see that they're producing equal values.
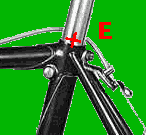
| Point E essentially describes the seattube geometry. In most cases, it describes the seatpost angle. If the seatpost and seattube angles are not exactly the same due to exotic frame construction, then this should be noted. The seatpost angle is derived in conjuction with point C, the crank location. As with point D, the specific measuring point also indicates the point of maximum engagement of the seatpost. In otherwords, how low can the seat go. If the end of the seat tube has a decorative flange or point in the front, that must be the point along the tube where the measurement is taken, for this is the lowest point that the seat can be set. Obviously, where the seat actually winds up is rider dependent, but it is the intersection of the seattube line and the distance from the cranks the rider likes the seat. |
|
To measure E: Measure the exact same way as point D, if it is easier, you can measure from point B and do the subtraction.
Point F is the reference dimension. From strictly a frame builder point of view, it is superfluous. It is included, however, because in the reality of working with bicycle geometry in general, it will prove to be extremely useful. If point F measures anything, it is the handlebar offset from the stempost of a particular stem. Obviously when measuring a bare frame without components (even if it has a headset), this dimension must be left blank. The idea, of course, is to record an indication of one of the most critical factors on a bicycle - hand position. By including this measurement in the standard profile of bike geometry, a complete picture of all the critical points are taken into account. Another reason for this measurement point is the fact that stems and frames are seldom interchanged and are always designed as a matched pair. On the other hand, this point is one of the easiest to change.
To measure F: Measured the exact same way as point D. It is not such a critical measurement (other properties don't depend on its accuracy), so don't fret over it too much.
| Poing G is one of the more complicated and defines the last piece of critical frame information - rake and trail. In conjunction with point D, it describes the angle of the steering column which is a critical property of a bicycle frame. In relation to point A, it shows how far in front (or behind?) the steering column, the wheel is, information critical to steering geometry. Point G is explicitly defined as the point along the steering tube's axis which is the same distance from the ground as the front axle. From this point and the others described, one can calculate the rake and trail. For reference, the rake angle is the angle from vertical of the head/steering tube. To understand what trail is, consider the imaginary point where the line of the steering tube intersects the horizontal ground. The distance from this point to the point of actual tire contact (directly below the axle) is the trail. |

|
To measure G: To get Gx hold a straight edge up to the headtube/forktube/stem. Try to hold the edge near where the center of these tubes is - the mark made for point D can help. Then measure from the axle point A to the straight edge as horizontally as you can. This is a difficult measurement to get accurate, but it is at least short.
So, this is my system of bike measurement. Unlike the rather obfuscating collection of numbers in the fine print of bike catalogs, my system allows one to completely predict exactly where the important geometrical aspects of a particular bicycle will be in use. To review, it is not trivial to remind ourselves what these points are - butt, hands, feet, rear wheel, front wheel, steering angle, steering trail.
In my opinion, any more information about a bike is a question of details. Presumably, this information in the format collected here shouldn't be "improved" as a process of bike design. If I purchase a bike, I don't want one with an "improved" hand position or whatever. An experienced rider could develop preferences for these dimensions that theoretically should remain unchanged as long as the rider doesn't change size. A very experienced rider may have a collection of preferences depending on what type of cycling they were going to be doing - criterium racing, TT, treking, commuting, etc.
What my system does NOT begin to evaluate or record are things like where specific tubes are nor what their geometrical composition is. Questions like a monostay vs. traditional seat stay, or "girl's" bike vs. "boys" are completely irrelavent to the riding rider from a geometrical point of view. Those aspects of a bicycle frame are what the designer has to work with to acheive various goals such as convenience, load carrying capacity, strength, durability, stiffness, aesthetics etc.
But wait, there's more!! I wrote a nice, nice program on the HP48 to input this information and then to immediately graph it. This allows quick (in bikestore) measurements and comparisons with other frames.
<<
OBJ-> DROP 'G' STO 'F' STO 'E' STO 'D' STO 'C' STO 'B' STO 'A' STO
-100 1200 XRNG 100 1000 YRNG
G G B C C E E B E D D F 1 6 START LINE NEXT
A A IM 0 360 ARC B B IM 0 360 ARC C 175 O 360 ARC
D G - 2 / G + DUP D LINE A LINE
PICTURE
>>
I save "bikeobjects" as variables. The bikeobject consists of a list of
imaginary numbers (aka coordinate pairs) like this (my Trek 920):
{(0, 317) (1065, 317) (638, 285) (220, 833) (785, 765) (130, 960) (45, 317)}
Put something like this on the stack and execute the program and have a look at the geometry. By putting a different bikeobject on the stack and running it, you can superimpose two. To clear, issue the "ERASE" command from the stack (Alpha alpha and type it in...).
| Return to Bike Page | |
| This page was created with only free, open-source,
publicly licensed software. This page was designed to be viewed with any browser on any system. | |
| Chris X. Edwards ~ January 2004 |